General
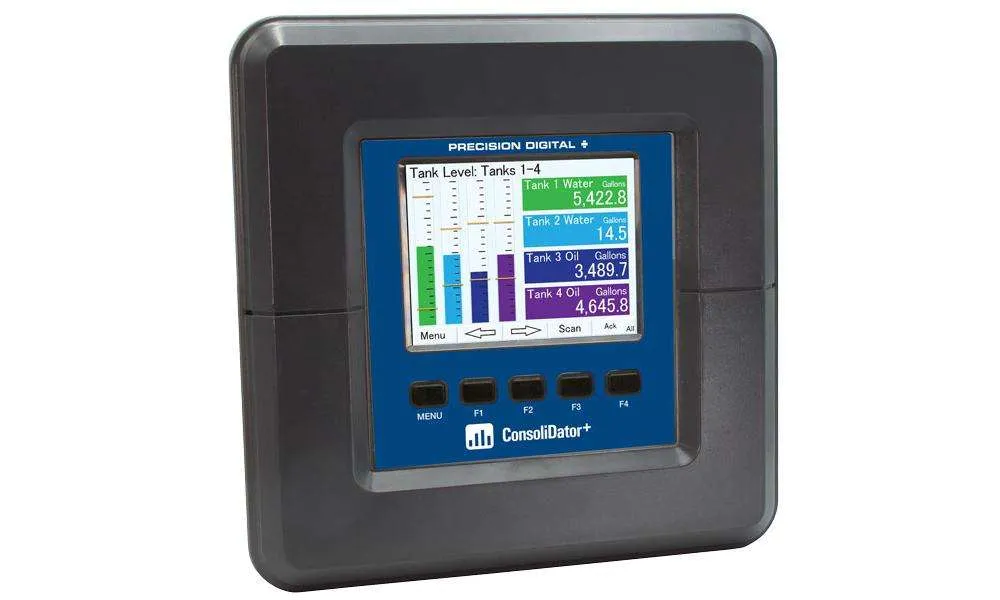
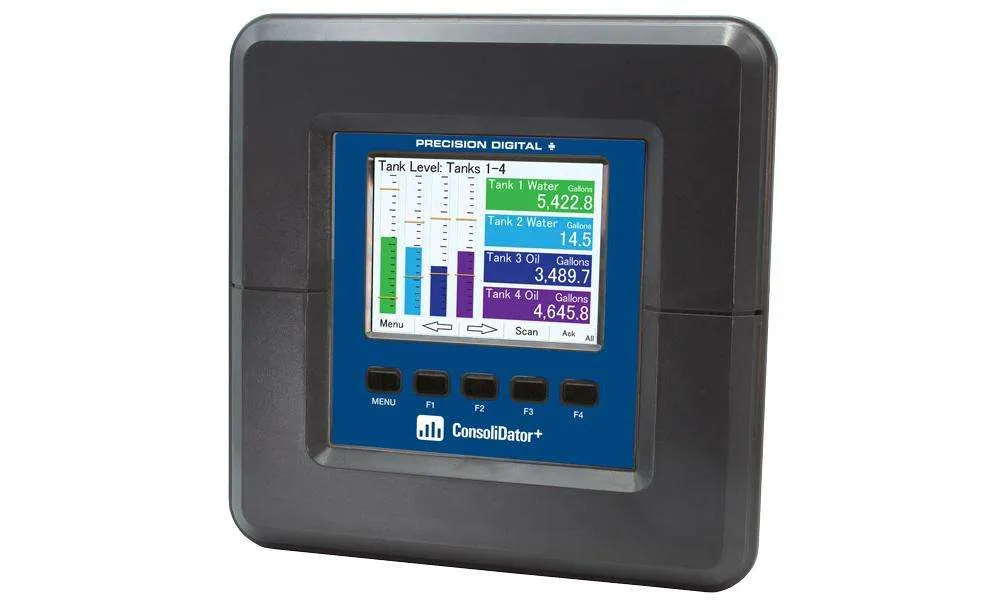
Display: Color; QVGA (320×240 px), 5.7″ (145 mm) diagonally, white backlight Bargraph: Twenty divisions Numerical: Up to 15 digits (±999,999,999,999,999) Feet & Inches Format: 99,999′ 11.9″
Screen Bargraph: Enable/disable: Channels, totals, timers Bargraph scale: 0 – 100%, independent of channel scale. Twenty divisions: 5% each. Screen: Select to show bargraph or not.
Color Selection: 65 colors selection
Customize bargraph, panel background, and text for normal and alarm conditions.
Decimal Point: 0 to 15 decimal places, user selectable
Engineering Units: User selectable units or custom units Time, Distance, Volume, Pressure, Weight, Temperature, Current, Voltage, Percent, Amps, Volts, Counts, Logic, and Custom, Any unit/unit of time or other units
Units Conversion: Units’ conversion is supported for channels, totals, timers, and any function using those parameters. Channel scaling must be in the intended base units (e.g. Gallons/min)
Display Update Rate: User selectable: 0.1 to 0.5 sec (10 updates/sec to 2 updates/sec)
Programming Method: Front panel buttons, external buttons, or ConsoliDator+ Software
Number of Alarms: Up to 64 high or low Automatic (non-latching) or latching On & Off time delays. May be assigned to one or more relays. Note: Alarms are independent from relays.
Alarm Types: Single Source: One input
Multi-Source: Two or more inputs
Interval: Enter time interval and On Time
Day & Time: Select day of the week & time
Alarm OR: Any active input alarm triggers the OR alarm
Alarm AND: All alarms must be active to trigger the AND alarm
Alarm Ack & Reset: Automatic only (Non-latching)
Automatic and manual
Manual only (Latching)
Manual with Ack only after alarm is cleared (Latching with Clear)
Alarm Indication: 1. Bargraph, panel, and text can be set up to change color on alarm
2. Enable internal buzzer
3. Assign external relay to drive a horn
Internal Buzzer: 60 dBA @ 24 inches (61 cm) Enable/disable in System – General menu. Associated with alarm Horn setting
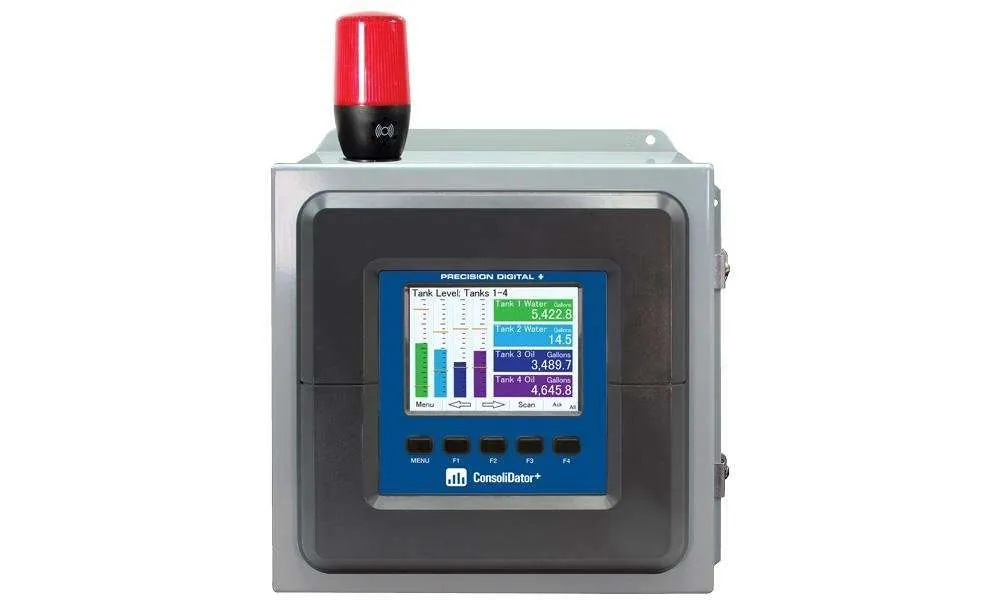
External Horn (Sold separately): Assign any relay to the Horn function to activate an external horn when alarm condition is detected.
Live Channel Calibration: Live calibration of channels is independent of the input calibration used for scaling.
Input & Output Cards: Max Number of I/O Cards: 7, Analog Inputs: 4/card, Pulse Inputs: 4/card, Analog Outputs: 5/card, Relays: 5/card
Number of Screens: Up to 20 screens with 1 to 8 PVs or items per screen. Enable or disable screen title, channel #, and bargraph Automatic or manual scanning Scan time: 1 to >1000 sec, independent for each screen. F1-F4 keys are assigned per screen
Function Keys: User programmable (See defaults below)
F1 = Previous ← F2 = Next → F3 = Scan/Stop F4 = Ack
Number of Channels Up to 99 channels
Input Source: 4-20 mA, Pulse, Digital, Modbus, another Channel, Total, Timer, Alarm, Date & Time, mA Output, Relay Output, Digital Output, or Modbus Output
Password: Programmable password restricts modification of programmed settings. View and Setup menus are password protected, function keys and digital inputs are not protected.
Simulation Mode: Inputs, channels, totals, timers, and alarms can be simulated from the View menu or a function key. Simulation mode is not saved on power down. Alert! message is provided for simulated items.
Manual Control: Analog outputs and relays can be controlled manually from the View menu or a function key. Manual control mode is not saved on power down. Alert! message is provided for outputs in manual control. Note: If it is necessary to turn relays off and maintain the condition through power cycle, configure the relays to Always Off.
Non-Volatile Memory: Settings stored for a minimum of 10 years.
Power (User Selectable Based on Wiring): Three-terminal connector (L, N, GND)
AC: 80-264 VAC, 47 to 63 Hz, 60 W max, DC: 113-370 VDC, 60 W max (L, N)
Two-terminal connector (G, 24V) DC: 24 VDC ±10%, 60 W max
Backup Power Supply: If AC and DC power are connected, the 24 VDC can be used as backup power in AC power failure. Note: DC supply must be less than 24 VDC; otherwise the system runs on DC power.
Fuse: Unit is protected internally with auto-resettable fuse. AC: 1.25 A max, DC: 3.7 A max
External Fuse: Recommended external fuse slow-blow 120 VAC: 2.0 A, 240 VAC: 1.0 A, 24 VDC: 4 A
Isolation & Grounding: 1500 V Analog inputs/outputs-to-power line
500 V Analog input-to-input, input-to-output, analog output-to-output
All analog inputs and analog outputs are isolated from each other.
Note: DC Power is not isolated. DC- is connected to Earth Ground. Digital I/O, USB, and Ethernet are grounded.
Environmental: Operating temperature range: -40 to 60°C (-40 to 140°F)
Storage temperature range: -40 to 60°C (-40 to 140°F)
Relative humidity: 0 to 90% non-condensing
*All functions operate down to -40°C (-40°F.) If the LCD response is slower, increase the display refresh setting.
Internal Fan: Automatic temperature-controlled fan turns on if the inside temperature reaches 50°C and increases the speed as the temperature rises to 60°C.
Internal Heater: Automatic temperature-controlled heater located behind the LCD turns on at 0°C, delivering the minimum power. If the temperature drops below -10°C, the heater delivers its maximum power.
Connections: Removable screw terminal blocks, Inputs/Outputs: 12 to 24 AWG wire
Digital I/O: 16 to 30 AWG
RS-485: 12 to 24 AWG wire
RJ45 Ethernet connection
USB ports: Micro-USB (Device), cable included.
Tightening Torque: Screw terminal connectors: 5 lb-in (0.56 Nm)
Digital I/O terminals: 2.5 lb-in (0.28 Nm)
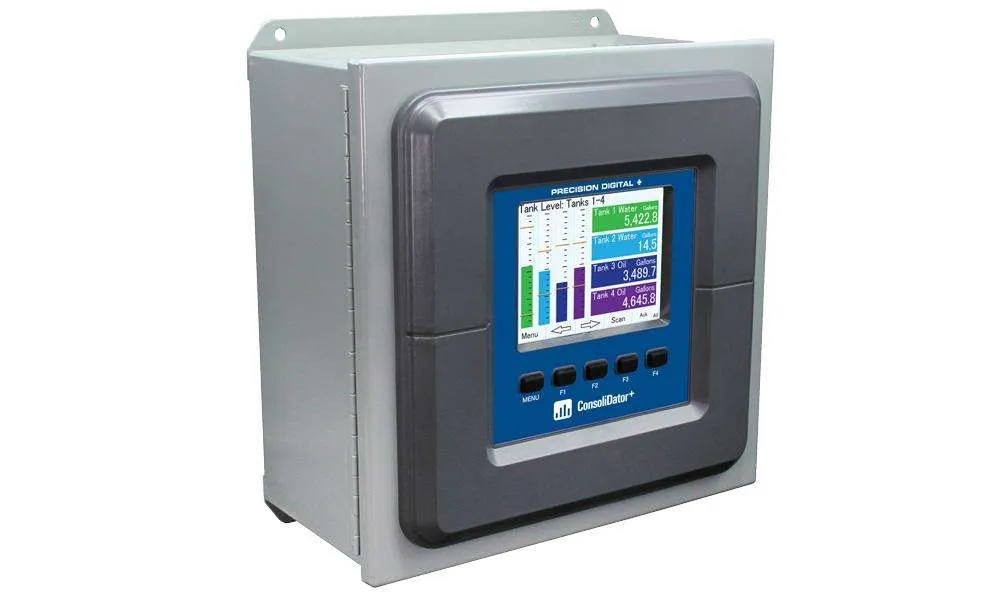
Enclosure: Enclosure Body: Thermoplastic Polyester, Color: Gray, Display Window: Clear Polycarbonate, GE LEXAN HP12W, Front Panel Keys: Silicone rubber
Mounting: Panel-mounting frame and twelve screws (provided)
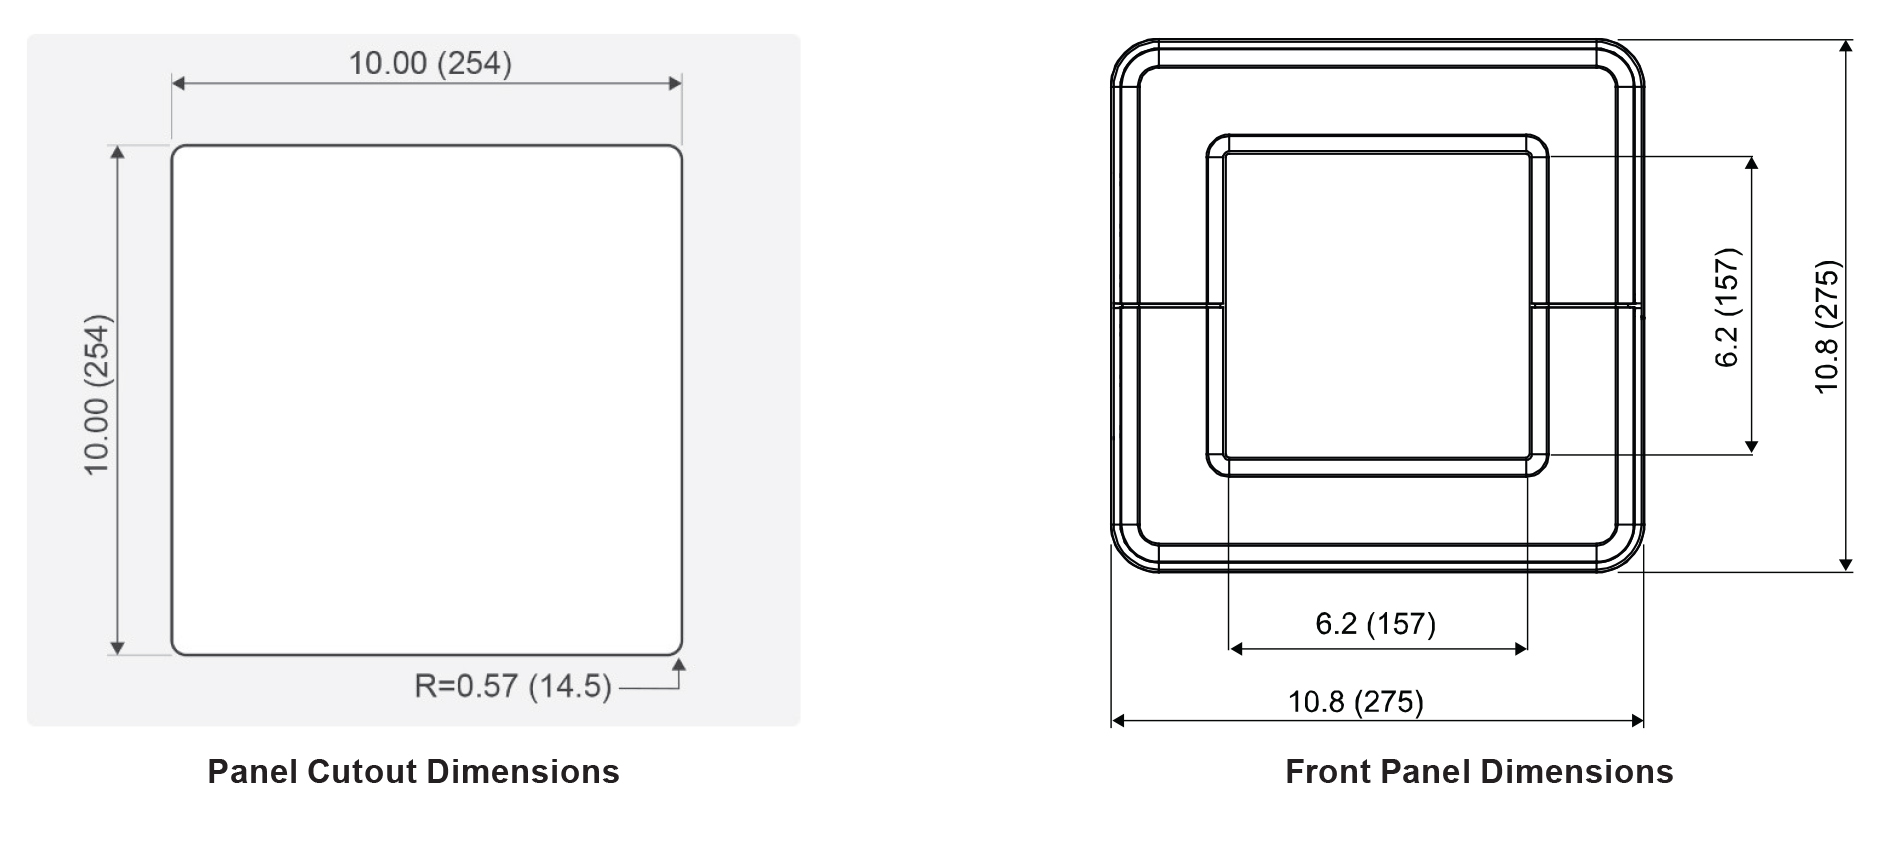
Cutout: 10.0″ x 10.0″ ±0.05″ (254 mm x 254 mm ±1.3 mm) (H x W)
Panel thickness: 0.07″ – 0.35″ (1.8 mm – 8.9 mm)
Clearance behind panel: 6″ (152 mm)
Overall Dimensions: 10.85″ x 10.85″ x 4.87″ (276 mm x 276 mm x 124 mm) (H x W x D)
Weight: Ex: PD9000-XY-4PI-8AI-10AO-10RY
7.4 lb (3.4 kg) approx.
Warranty: 3 years parts and labor
Totalizer
Number of Totalizers: Up to 32 totalizers, 15 digits with comma separator
Totalizer Inputs: Calculates total based on selected rate channel, pulse input, digital input, or triggered event for non-rate channels. Total is stored in non-volatile memory if power is lost.
Maximum Total: 18 digits, 999,999,999,999,999,999
Rate Channel Input: 4-20 mA input, Pulse input, Modbus input
Rate & Total Decimal Point: Independent and user selectable from 0 to 15 places
Totalizer Reset: Via front panel keys or digital inputs
Non-Resettable Total: Total may be setup to be non-resettable to prevent unintentional reset. This can be changed in the Setup Totals menu.
Total Units Conversion: Input: Rate channel
Total units may be different than rate units.
Use the custom units to convert to any unit (e.g. Gallons to MGal: Factor = 0.000001)
Pulse Input K-Factor: K-Factor = pulses/units of measure
Calculates total directly from pulse input, digital input, or Modbus input.
Create rate channel by entering K-Factor, units and time base in sec, min, hr, or day. Decimals: 0 to 15
Count Down: Total may be setup to count down from a predetermined value entered by the user
Preset Value: Enter the preset value to count up or down
Reset total sets total to the preset value; to reset to zero uncheck the Preset box.
Roll-Over: Enter the value for total to roll-over to 0
Example: Roll-Over = 1,000,000 Total goes to 0 after 1 million
Negative Total: Allow total value to count below 0 for bi-directional flow based on rate channel
Total Bargraph: Bargraph may be scaled to represent the expected maximum total.
Function Keys: Screen Setup: Assign F1-F4 to Reset Total, Enter Total, Add To, or Remove From total
Real Time Clock
Date Format: Month, day, year (e.g. July 16, 2020)
Time Format: 24 hour; 00: Midnight
hh:mm:ss
Battery: 3 V, P/N: CR2032 included
Display Date & Time: Displayed on the top line of Setup and View menus, including day of the week.
Screens: Date & Time can be added to any screen.
Channels: Date & Time can be the input to a channel.
Display Format: yyyy/mm/dd hh:mm:ss
Channel & Math Functions
| Scale Functions | K-Factor | Converts number of pulses to volume or other units |
| Scale Factor | Apply multiplier to a channel |
Scale Linear
2-Pt | Scale a channel |
| Scale Multi-Point | Multi-point scaling of a channel |
| Scale Square Root | Apply square root to a channel – Differential Pressure from two channels |
| Scale Exponent | Apply exponent for weirs and flumes open channel flow calculation |
Round Horizontal
Tank | Calculate volume in round horizontal tank with flat ends |
| Units Conversion | Convert base units to any units |
| Math Functions | Constant | Assign fixed value |
| Summation | Add two or more channels |
| Difference | Subtract any two channels |
| Abs Difference | Difference always positive |
| Absolute Value | Convert channel value to positive |
| Average | Find the average of channels |
| Weighted Average | Assign % weight to two or more channels |
| Multiply | Multiply two channels |
| Divide | Divide two channels |
| % Efficiency | Calculate input to output efficiency ((A-B)/A)*100% |
| Additional Functions | Compare |
| Greatest | Greatest value in a group of channels |
| Least | Smallest value in a group of channels |
| Measure |
| Tare | Calculate net value when Tare function is applied via function key |
| Maximum | Maximum value reached by the process |
| Minimum | Minimum value reached by the process |
| Percent (Bargraph) | % bargraph of any: 4-20 mA input, channel, total, timer, or mA output |
| Duration | Keep track of time a condition has been present (e.g. high alarm active) |
| Rate of Change | Calculates how fast a process is changing /sec, /min, /hr, /day |
| Filter |
| Window Average | Enter time to calculate the average |
| IIR (First Order) | Infinite Impulse Response (slow) |
| Cutoff | PV = 0 below cutoff
Flip Side: 0 above (-) |
| Limits | Sets PV’s upper & lower limits |
| Control |
| Sampler | Uses channel to trigger relay sample and select sampling time (e.g. Turn relay on for 30 sec every time total increases by 1,000 Gallons) |
| On-Off Control | Set on & off control based on process value |
Select
A or B | Switch between 2 inputs |
| Schedule | Daily or weekly event |
| Relays |
| Cycle Count | Number of relay cycles since reset |
| Runtime | Relay runtime (ON) hh:mm:ss |
| Mobus |
| Time Since Read | Time since a Modbus master device read a register |
| Time Since Write | Time since a Modbus master wrote to a register |
List of Engineering Units
None: No units
Time: seconds, minutes, hours, days & /sec, /min, /hr, /day
Distance: (Height): cm, m, Inch, Feet, Ft-In, Yard, km, miles, custom
Volume: Gallons, GAL, L, IGAL, M3, BBL, BUSH, cuYD, cuFt, cuIn, LiBBL, BBBL, HECtL, quarts, pints, fl oz, mL, DT, M/T, custom
Pressure: psi, Pa, bar, hPa, kPa, MPa, GPa, inH2O, cmH2O, inHg, mmHg, atm, kg/cm2, kg/m2, mbar, Mbar, Torr, mTorr, custom
Weight: grams, Oz, Lb, lb, g, kg, onces, tons, tonnes, custom
Temperature: C, F, K, Ra
Percent: %, PCT, Percent, custom
Amps: mA, Amps, custom
Volts: V, mV, Volts, custom
Counts: Pulses, Cycles, Counts, custom
Logic: ON, OFF, OPEN, CLOSED, YES, NO, START, RUNNING, STOP, STOPPED, PUMP ON, PUMP OFF, OK, OKAY, ERROR, WARNING, custom
Custom: Enter unit’s name, type, base unit, and factor.
4-20 mA Analog Inputs
Number of Inputs: (4) Analog inputs/card, (28) Analog inputs max, no other I/O
Typical Input: 4-20 mA
Input Range: 0-24 mA
Accuracy: ±0.03% of full scale ±1 count
4-20 mA Display Value: Up to six full digits, (Recommended) ±999,999
More digits may be used, but the stability will be affected. Increase the filter value and lower the display update rate to get a more stable reading.
Transmitter Power Supply: Isolated 24 VDC @ 200 mA/input
Max current: 1,600 mA (All inputs), (8) Analog Input @ 200 mA max (28) Analog Input @ 20 mA max
Available on AC or DC powered units
Temperature Drift: Better than: 20 ppm/°C from -40 to 60°C ambient
Filter: Window: 0.5, 1, 2, 4, 8 sec, IIR: 16, 32 sec
Glitch Filter: Discards a single sample caused by high frequency noise
Filter Bypass: 0 to 100 % of full scale
Filter is ignored, if the signal change is greater than bypass value
Channel Input Scale Function: Linear 2-Point, Multi-Point (up to 50 points), Square Root, Programmable Exponent, Scale Factor, Round Horizontal Tank (Volume), None (mA Input Reading)
Channel Input Live Calibration: Each channel may be calibrated using live calibration signal from a sensor or a calibrator.
Input Protection: Each 4-20 mA input is protected by an auto-resettable fuse, 30 VDC max. The fuse resets automatically after the fault condition is removed.
Input Impedance: 125 Ω typical, including auto-resettable fuse
Hart Transparency: The controller does not interfere with existing HART communications; it displays the 4-20 mA primary variable and it allows the HART communications to pass through without interruption. The controller is not affected if a HART communicator is connected to the loop. The controller does not display secondary HART variables.
Isolation: 1500 V: Input-to-power line
500 V: Input-to-input, input-to-output
All analog inputs and analog outputs are isolated from each other.
Normal Mode Rejection: 100 dB at 50/60 Hz
Common Mode Rejection: 90 dB at 50/60 Hz
Pulse Inputs
Number of Inputs: (4) Pulse inputs/card, (28) Pulse inputs max, no other I/O
Input Type: Active Square Wave, NPN, PNP, Reed Switch, Coil (Magnetic Pickup)
Normal threshold: 1.2 V (0.8 to 3.0 V)
High threshold: 2.5 V (2.0 V to 6.0 V)
Coil threshold: 20 mV (Low) or 100 mV (High)
Signal Level: Active Square Wave: 0 to 30 V max
Typical: 0 to 5 V
Coil: 20 mVp-p to 30 Vp-p (Magnetic Pickup)
Input Impedance: Active, NPN, Reed: 10 kΩ pull-up to 5 V
PNP: 10 kΩ pull-down to (S-)
Coil: >2 kΩ (20 mV sensitivity), >10 kΩ (100 mV sensitivity)
Isolation: Pulse inputs are not isolated, (S-) terminal is connected to system GND
Input Protection: ±36 V, non-isolated
Frequency Response & Signal Level:
Active Square Wave 5 V: 0 to 100 kHz
Coil (Magnetic Pickup): 0 to 50 kHz
Frequency – Signal level (Coil: 20 mV)
20 mVp-p – 100 Hz
100 mVp-p – 10 kHz
Frequency – Signal level (Coil: 100 mV)
100 mVp-p – 90 Hz
500 mVp-p – 5 kHz
20 Vp-p – 50 kHz
Minimum Frequency: 250 μHz with High Gate = 4,000 sec
Low Gate: 1 to 99 sec
High Gate: 2 to 4,000 sec (Must be higher than low gate)
Accuracy: ±1 count for K-Factor > 1 or 30 ppm
K-Factor: Programmable pulses/unit with up to 15 decimal resolution
Scale Pulse Input: Linear 2-Point
Multi-Point Scaling: 2 to 50 points
Live Calibration: Pulse input channel may be calibrated using live calibration signal from a sensor.
Modbus Inputs
Number of Inputs: 199 Modbus RTU
Scale MB Input: Modbus input may be used to create channels and totals, the same way 4-20 mA inputs are used.
Data Type: Bit-Logic
Signed/Unsigned: 16 (Short), 32 (Long), 64 (Long-Long)
Float 32
Float 64 (Double)
Decimal Point: User selectable
Comm Break & Timeout: Specify what value to hold on comm. break and how long to wait for new data before reporting a break condition.
Input Action: Specify what should happen when new data is written to the input register (e.g. add value to total).
Digital Inputs & Outputs
Digital Inputs: 5 Inputs, non-isolated, 30 VDC max
Standard feature on all ConsoliDator+ skus
Low: 0 to 1.2 V
High: 2.8 to 30.0 V
Internal pull-up: 5 kΩ to 5 V
Max pulse frequency: 1 kHz @ 5 Vp-p
+5 V terminal: Internal pull-up 100 Ω
Note: Pulse inputs may be used as digital inputs
Digital Input Types: Normally open switch: External excitation not required (Current: 1 mA)
Open collector transistor: 4.1 V open circuit voltage
Logic level: 0 to 30 V
Assignment & Operation: Active Low or Active High
Functions: Remote front panel button, total functions, timer control, alarm functions, screen navigation, horn functions, reset relay information.
Digital inputs can be used as input source for channels, totals, and alarms.
Digital Outputs: 4 Outputs
Standard feature on all ConsoliDator+ skus
Low: 0 V (no load), 1.5 V max @ 10 mA sink (External pull-up)
High: 5.0 V (no load), 3.5 V @ 10 mA load
Maximum current: 30 mA
Output impedance: 100 Ω
Output protection: 150 mA auto-resettable fuse
Max frequency: 5 Hz
Digital Output Assignment: Digital outputs require logic units as the input
Input sources: Digital input, Modbus input, channel, alarm, horn, always on, or always off
Input/Output Protection: ±36 V, non-isolated
Relays
Number of Relays: (5) Relays/card, (30) Relays max with (4) analog or (4) pulse inputs, no other I/O
Rating: SPDT (Form C)
Resistive load: Rated 10 A @ 120/240 VAC or 8 A @ 30 VDC
Inductive load: NO contacts: 1/3 HP, 120 VAC; 30,000 cycles
NC contacts: 1/8 HP, 120 VAC; 50,000 cycles
Minimum load: 100 mA @ 5 VDC
Isolation: 1500 VAC, 50/60 Hz for 1 min between coil and contacts
Deadband: 0-100% of full scale, user selectable
Electrical Noise Suppression: TVS diodes & snubbers on all contacts.
Recommended additional external snubber: 0.01 μF/470 Ω, 250 VAC (Order: PDX6901)
Assignment & Operation: Any relay may be assigned to any alarm, channel, total, timer, digital input, Modbus input, pump alternation, horn, always on, or always off. Multiple relays may be assigned to the same alarm or channel. All relays are programmed independently.
High & Low Alarm: Defined by set and reset points in the Alarm menu
High or Low Alarm: Assign relay to any alarm or channel for on/off relay control
Note: Automatic reset only for channel
Multi-Source High or Low Alarm: Assign relay to multi-source alarm to indicate common high or low condition.
Pulse Action: Set any relay for pulsing on/off timed relay control. Programmable pulse width (on/off time) and on/off delay.
Sampling: Relay must be assigned to channel setup for Sampler function with user-defined total increment and sampling time.
Pump Alternation: Any relay may be setup to alternate with any relay in the group. Multiple alternation groups may be setup.
Acknowledge: Front panel Ack key or digital input acknowledges alarms; relays associated with acknowledged alarm are turned off. Acknowledge all or any alarm.
Alarm Relay: Assign any relay to be driven by any alarm; acknowledging the alarm turns off the relay (non-fail-safe mode).
Time Delay: Programmable on/off delays, 0.0 to 999.9 sec
Independent for each relay.
Auto Initialization: When power is applied to the controller, relays will reflect the input’s state to the controller.
Fail-Safe Operation: The relay coil is energized when the process variable is within safe limits and the relay coil is de-energized when the alarm condition exists.
4-20 mA Transmitter Outputs
Number of Analog Outputs: (5) Analog outputs/card, (35) Analog outputs max with no other I/O cards (Seven I/O slots)
Output Range: 4.00 to 20.00 mA, nominal
Calibration: Factory calibrated for 4-20 mA
Scaling Range: Any process range, Reverse scaling allowed
Assignment & Operation: Assign to any analog or pulse input, digital input, Modbus input, channel, total, timer, alarm, or fixed value (none).
Note: Multiple 4-20 mA outputs can be assigned to the same input.
Accuracy: ±0.03% F.S. ±0.005 mA
Temperature Drift: 20 ppm/°C from -40 to 60°C ambient. (Output & Input drifts are separate)
Output Loop Power: Powered by controller or externally by 12 to 32 VDC
Output Loop Resistance: Powered by controller: 10 to 600 Ω
External 12 VDC: 10 to 200 Ω
External 24 VDC: 10 to 600 Ω
External 32 VDC: 10 to 1000 Ω
Isolation: 1500 V: Output-to-power line
500 V: Output-to-output, output-to-input
All analog inputs and analog outputs are isolated from each other.
Timers
Number of Timers: Up to 32
Time Format: hh:mm:ss with 0 decimals selected
Seconds with 1 or more decimals2
Automatic Actions: Power Up: Timer action on power up
Error: Action when an error is detected
Reset: Event causes the timer to reset
Start: Event triggers the timer to start
Stop: Event causes the timer to stop
Start / Stop Reset: The function keys and digital inputs can start, stop, and reset the timers, regardless of the automatic actions selected.
Assignment & Operation: Timers can be triggered, stop, and reset, by rising or falling signals from 4-20 mA input, pulse, digital, Modbus input, channel, total, other timers, alarm, mA output, relay, or Modbus output.
Count Down Timer: Select count down and enter starting time
Timer Alarm: Timer can be used to trigger alarms
Bargraph: Select bargraph during setup and scale the bargraph for 0 – 100% target time
Timer Control: Access timer control via the View Timer menu or assign a function key to timer control in the Screens menu
Timer & Relay: Timer can be assigned to drive relays based on selected set and reset points
Modbus® Serial Communications
Compatibility: RS-485 (EIA-485)
Protocol: Modbus RTU
Device Address: 1 to 247
Transmit Delay: 0 to 99 ms
Baud Rate: 1,200 to 115,200 bps
Data: 8 bit (1 start bit, 1 stop bit)
Parity: Even, Odd, None with 1 stop bit, or None with 2 stop bits
Ethernet Communications
Device: Lantronix Xport-05
Protocol: Modbus TCP/IP (Default), Modbus UDP/IP, Modbus RTU Over TCP/IP,
Modbus RTU Over UDP/IP
Port Settings (Do Not Change): Protocol: RS-232
Baud Rate: 9600
Data Bits: 8
Flow Control: None
Parity: None, Stop Bits: 1
Network Stack: IPv4
Ethernet MAC/PHY: 10/100 Mbps
Additional Specifications: Refer to the Lantronix Webpage at https://www.lantronix.com/products/xport/
Ethernet Port Configuration: Download the Lantronix DeviceIntaller software to configure the Ethernet port at https://www.lantronix.com/products/xport/
ConsoliDator+ Software
System Requirements: Windows® 7, 10
Compatibility: One software version for all skus
Connection: Micro-USB
Configuration: Configure inputs and outputs, channels, totals, timers, alarms, etc.
Configure bar graph and panel colors for normal operation and colors for alarm indication.
Save controller settings file on PC for programming other controllers or to restore settings.
Screens
The ConsoliDator+ can be programmed to display the data on up to 20 different screens in a variety of formats and colors, with and without bargraphs. The following screens show a typical main screen and channel details screen:
Main Screen
Channel Details Screen
Inputs & Outputs
The back panel is labeled with the I/O boards that were installed at the factory. The removable connectors are labeled with the connection signal for each terminal. The following diagram shows what the back of the sku PD9000-GP-4PI-8AI-10AO-10RY looks like. This sku accepts (4) pulse and (8) analog inputs and has (10) 4-20 mA outputs and (10) relays. (5) digital inputs, (4) digital outputs, RS-485 serial capability and USB connections are standard on all ConsoliDator+ skus. Ethernet is an option.
If all Input / Output slots are used exclusively for one function, the ConsoliDator+ can accept up to (28) isolated 4-20 mA inputs, (28) pulse inputs, (25) isolated 4-20 mA outputs, and (25) relays. If used as a Modbus slave only: (35) 4-20 mA outputs, (30) relays.
All units can be powered from AC or DC; both power connections can be used at the same time. The DC power supply can serve as backup power if the voltage is 24 V or less, otherwise the controller will run on DC power.
Notes:
- Each 4-20 mA input has its own isolated 24 VDC power supply to power the transmitter.
- Each 4-20 mA output has its own isolated 24 VDC power supply to power the output loop.
- Each relay is Form C and rated at 10 A.
- Input / output connections are made to removable screw connectors.
- Every ConsoliDator+ has five digital inputs (additional digital inputs can be obtained by using the Pulse Inputs).
- Every ConsoliDator+ has four digital outputs.
- Every ConsoliDator+ has RS-485 with Modbus.
- All ConsoliDator+ skus can be powered from either AC or DC Power.
- Ethernet with Modbus TCP is an option.
- Micro USB is used for programming the ConsoliDator+.
Setting Channel Parameters
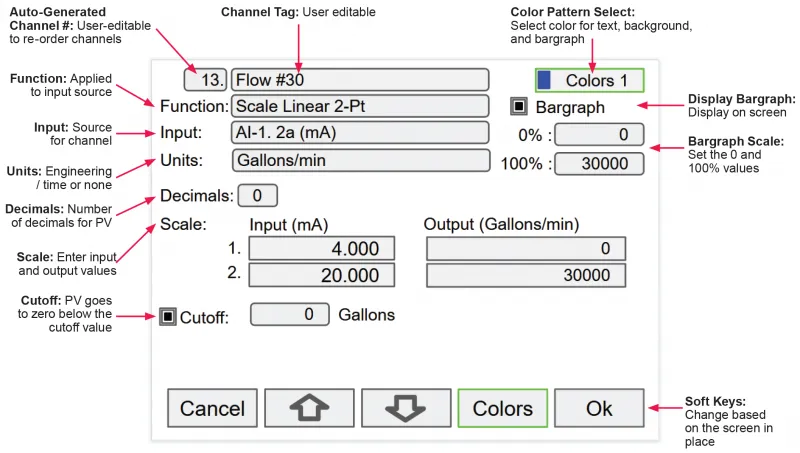
What makes the ConsoliDator+ easy to program is its intuitive setup screens. As shown in the first image below, the setup screen allows you to see all the relevant information you need when creating or editing a channel – all on one screen! When creating a new channel, the channel number is auto-generated for you. All you have to do is populate the appropriate fields such as the channel tag name, function, input, and units. Scaling the inputs and outputs, selecting number of decimals, and turning the bargraph on/off and inputing its values are also programmed from this screen. Multiple colors can also be selected for the text, background and bargraphs to customize the look of the display. During programming, the soft keys will change based on the screen in place. For instance, pressing the edit key will bring up the letters/numbers key pad and appropriate navigation keys will appear (Shown in the bottom image). See the PD9000 manual for details on setup and programming.
Individual Channel View
To view the details of any channel, press Menu and then press View – Channel. Select the channel of interest. Navigate through the different items using the navigation keys. A green bar indicates the selected item, press the R-key to step into and see more details about the inputs and outputs related to the channel in view.
In the following examples, the screens show all the parameters associated with Channel 1 including analog input, slot number and its current value, setpoints and status of alarms, and analog output and its mA value. The bargraphs in each these screens examples represent the current value in gallon units.
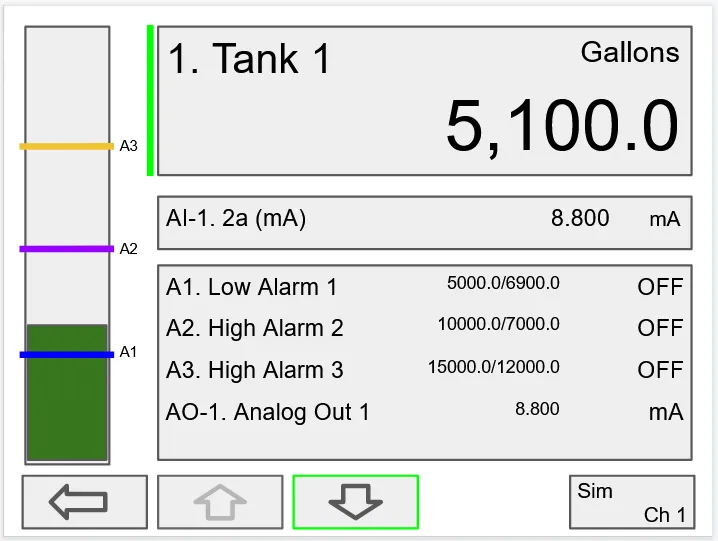
Alarm set points are indicated by horizontal lines.
Low & High Alarm Indication
If applicable, alarms may be acknowledged, and totals may be reset from the channel view screens. The alarm set points are indicated by a line at the corresponding value on the bargraph. Color selection for alarm conditions can be done in the Setup – Alarm menu or in the System – Display menu.
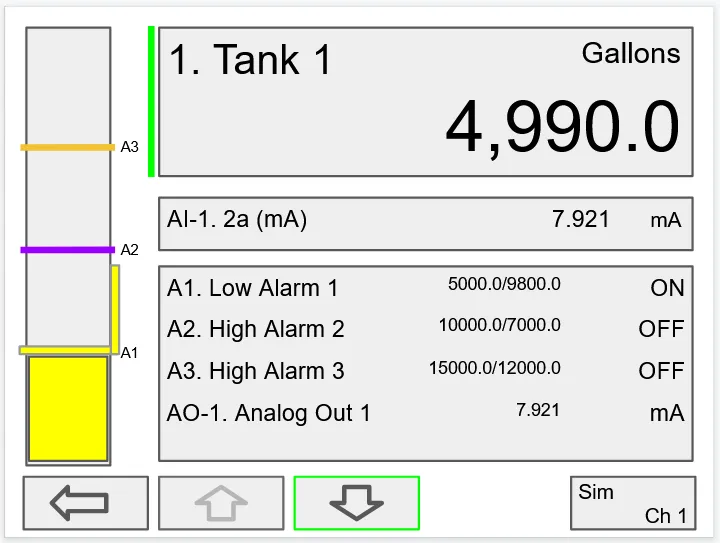
Active Low Alarm: Indicated by horizontal and vertical lines. The top of the vertical line is the reset point of the low alarm. The low alarm is indicated on the right side of the bargraph.
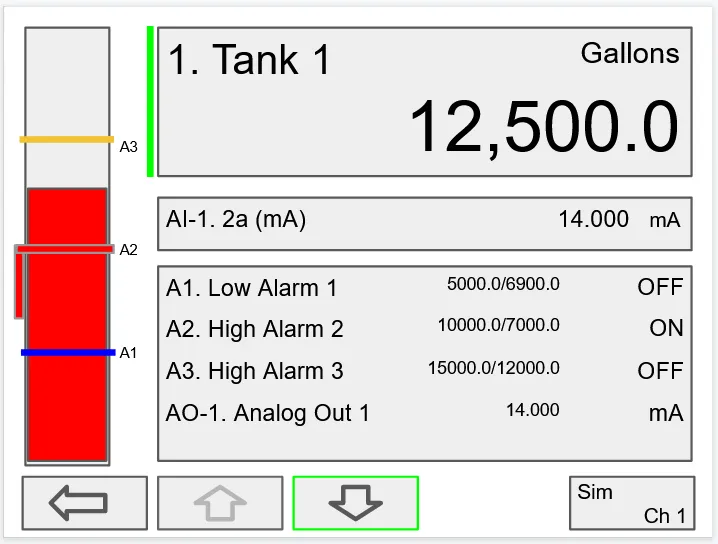
Active High Alarm: Indicated by horizontal and vertical lines. The bottom of the vertical line is the reset point of the high alarm. The high alarm is indicated on the left side of the bargraph.
Connections
Power connections are made to one of the power terminal connectors. All units are capable of being powered either by AC or by DC for the ranges specified.
90-264 VAC Power
- Use three-terminal power connector as shown in the Figure below.
- Unit is protected internally with 1.25 A auto-resettable fuse. 2 A max, slow blow, 250 V min UL Recognized external fuse recommended.
24 VDC Power ± 10%
- Use two-terminal power connector as shown in the Figure below.
- Unit is protected internally with 3.7 A auto-resettable fuse. 4 A max, slow blow, 50 V min UL Recognized external fuse recommended.
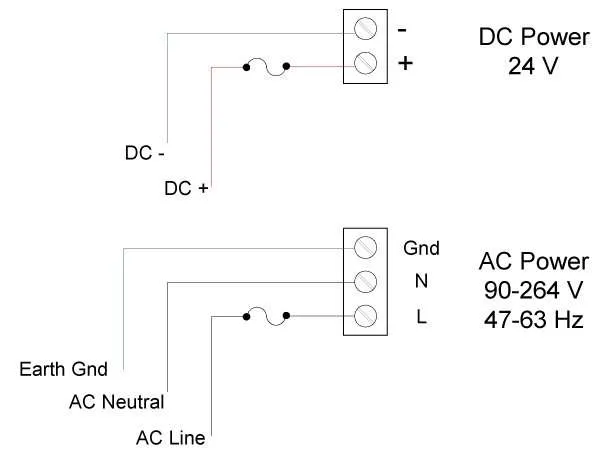
Power Connections
Note: The controller may be powered by AC voltage with the 24 VDC power connection used as backup power.
Isolated Input Signal Connections
Isolated input signal connections are made to removable screw terminal connectors, which are labeled individually on the back panel of the controller. The back panel shows the type of input card installed in each slot (The top slot is #1 and the bottom is #7). Individual inputs are referenced as PI-1 to PI-4 for pulse inputs and AI-1 to AI-4, AI-5 to AI-8, etc for analog inputs.
4-20 mA Analog Input Connections
Analog 4-20 Input connections are made to screw terminal connectors (two inputs per connector). The following figures show examples for typical applications. Each of the 4-20 mA inputs may be connected in any of the modes shown below.
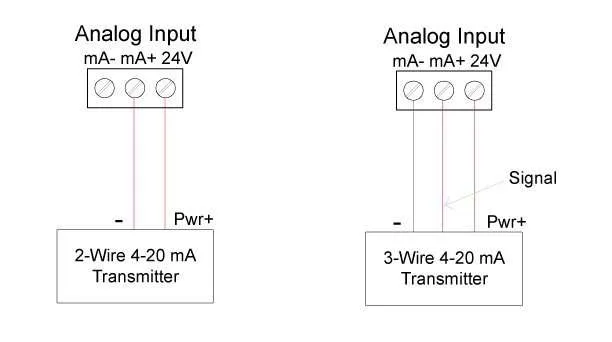
Transmitters Powered by ConsoliDator+’s Isolated 24 VDC Power Supply

Transmitter Powered by External Supply or Self-Powered
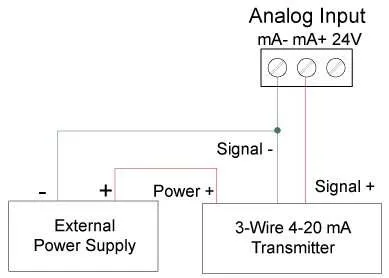
Three-Wire Transmitters Powered Externally
Flow Meter Pulse Input Connections
Flow Meter Pulse Inputs are wired to four-terminal connectors (two inputs per connector). A square waveform is used in the illustration, but the input is capable of reading many other types of signals within the voltage and frequency ranges specified.
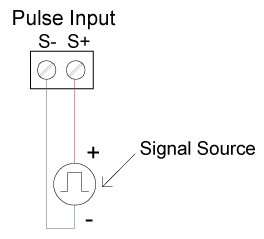
Flow Meter Pulse Input Connections
Digital Input Connections
Inputs are wired between terminals 1-5 of the digital input connector and the G terminal of the 2-position connector above the digital inputs. Normally open switch contacts may be used as shown in the figure below. The diagram also shows a Digital Input using an NPN open collector transistor output from a live signal. Logic LO or switch closure appearing across the terminals is interpreted as ON. When using an open collector transistor, a logic HI at the base (marked “B” in the figure below) will be interpreted as ON. The 2-position connector has a +5 V terminal that may be used to provide excitation to some sensors requiring more than the pull-up provided on each digital input terminal.
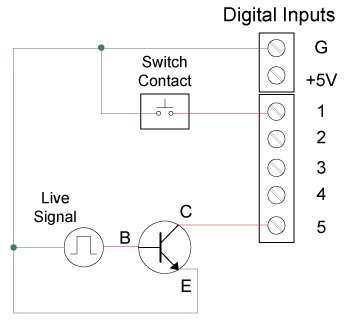
Digital Input from Switch Closure and Live Signal
Analog Output Connections
The following figures show examples for isolated 4-20 mA transmitter output connections. Terminal connectors are labeled individually. The analog outputs are isolated from each other and from the inputs. They are powered internally to provide an active 4-20 mA output loop. The outputs may be powered externally by connecting the positive voltage to the Ex+ terminal.

Active 4-20 mA Output Powered by ConsoliDator+
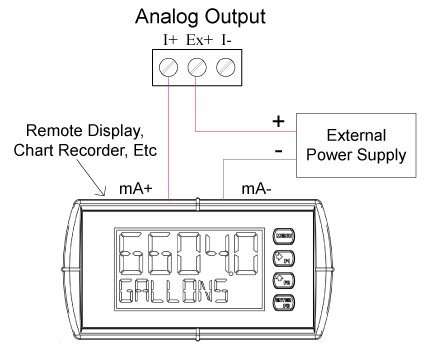
Passive 4-20 mA Output Powered by External Supply
Note: Analog inputs and outputs are isolated from each other.
Digital Output Connections
The digital outputs may be used to drive digital inputs, alarm annunciators, or other devices such as solid state relays that can be driven with low voltage signals.
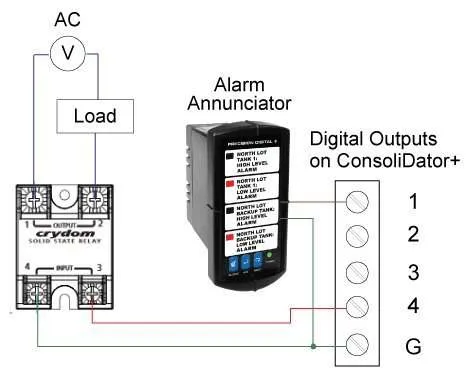
Digital Outputs Driving 5V Solid State Relay and Alarm Annunciator
Relay Connections
Relay connections are made to three-terminal connectors labeled individually. There are five relays per card.

Relay Connections
Switching Inductive Loads
The ConsoliDator+ has internal circuitry to protect the relays from inductive loads, however, the use of suppressors (snubbers) is strongly recommended when switching inductive loads to prevent disrupting the microprocessor’s operation. The suppressors also prolong the life of the relay contacts. Suppression can be obtained with resistorcapacitor (RC) networks assembled by the user or purchased as complete assemblies. Refer to the following circuits for RC network assembly and installation.
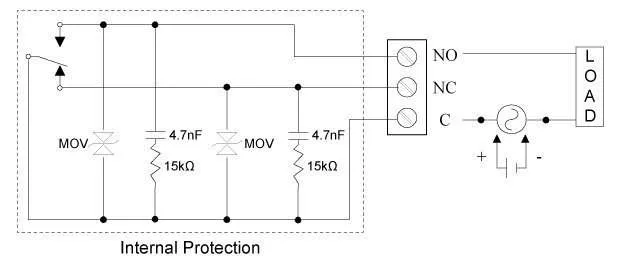
AC and DC Internal Inductive Load Protection
For additional external protection choose R and C as follows:
R: 0.5 to 1 Ω for each volt across the contacts
C: 0.5 to 1 μF for each amp through closed contacts
Notes:
- Use capacitors rated for 250 VAC.
- RC networks may affect load release time of solenoid loads. Check to confirm proper operation.
- Install the RC network at the instrument’s relay screw terminals. An RC network may also be installed across the load. Experiment for best results.
Use diode with a reverse breakdown voltage two to three times the circuit voltage and forward current at least as large as the load current.
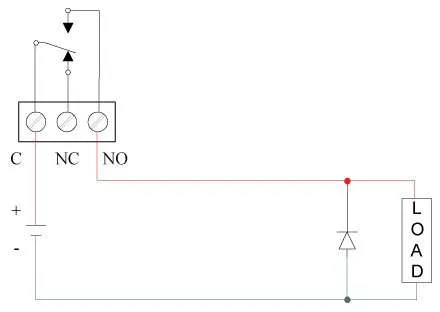
Low Voltage DC Loads Protection
RC Networks Available from Precision Digital
RC networks are available from Precision Digital and should be applied to each relay contact switching an inductive load. Part number: PDX6901.
Serial Communication Connections
The RS-485 port for serial communication (using Modbus protocol) has three terminals labeled D+, D-, and G. It is strongly recommended to use three-wire shielded cable and to always connect the ground terminal to the other equipment’s ground to avoid differential voltage between the systems. Distances up to 4000 feet can be reached with RS-485. Up to 32 Modbus devices may be connected to a single RS-485 bus.

Serial Connections
Ethernet Option
The Ethernet port is available on the RJ45 connector. This allows the ConsoliDator+ to connect to a local area network. The Ethernet port option is configured using the Lantronix DeviceInstaller software, available for download from the Lantronix’s Website at www.lantronix.com/products/xport/. See the PD9000 ConsoliDator+ manual for ethernet port setup details.
External Keypad Connections
Normally open pushbuttons may be wired to the digital inputs connector for use when the front panel of the controller is not accessible. The external keys may be assigned to replicate the Menu and F1-F4 function keys.
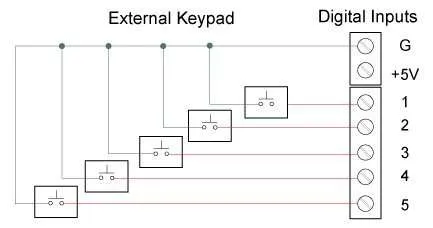
External Keypad Connections
Dimensions
Units: Inches (mm)
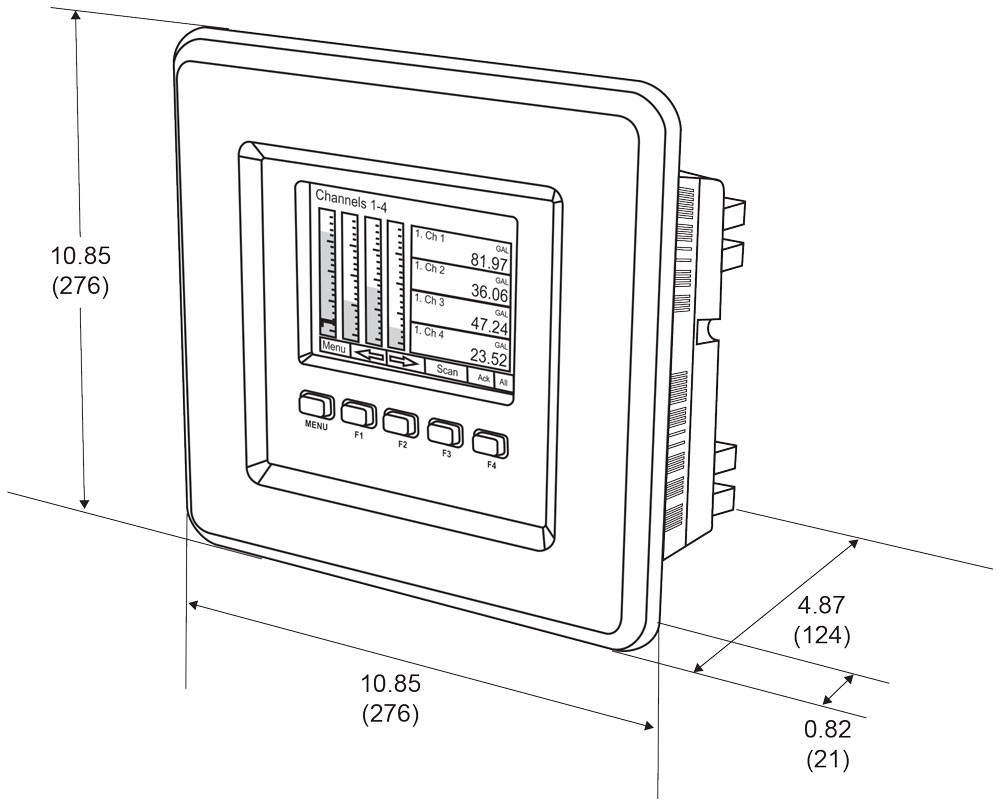
Panel Mount ConsoliDator+ Overall Dimensions
Panel Mounting
- Prepare panel cutout per the dimensions provided
- Locate the panel mounting bracket and screws
- Inspect the controller to assure the gasket is securely in place
- Insert controller in the panel cutout, the latches on the top and bottom should hold it in place
- Insert the panel mounting bracket from the back of the panel, observe the orientation of the piece marked TOP
- Install the 12 screws provided
Notes:
- Panel cutout: 10.0″ x 10.0″ ±0.05″ (254 mm x 254 mm ±1.3 mm)
See Panel Cutout Dimensions. - Panel thickness: 0.07″ – 0.35″ (1.8 mm – 8.9 mm)
- Clearance: Allow 6″ (152 mm) behind panel

